The REDARC BCDC wiring diagrams show how to correctly install a BCDC In-Vehicle Charger using either a common ground setup or an Anderson connector for detachable battery systems.
In both cases, all negative connections must share a common ground, though modern vehicles with Smart Alternators may require grounding to the chassis instead of the battery negative.
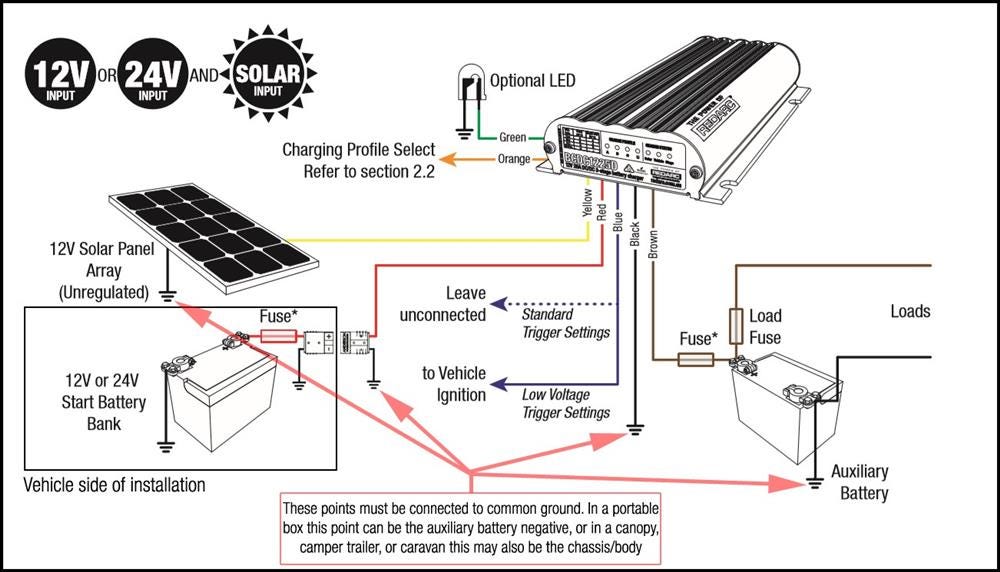
Important
For your safety, REDARC recommends installation by a qualified auto electrician or technician. Our trusted REDNetwork is made up of professional auto electrical businesses certified by REDARC to install the complete of REDARC solutions. Find Your Local Installer
Below, we have two REDARC BCDC wiring diagrams. The first is the one we use when installing a BCDC In-Vehicle Charger and auxiliary battery system into a vehicle. The second is for an installation using an Anderson connector to connect the vehicle input to the BCDC charger.
Installation with a common ground
When installing a REDARC BCDC In-Vehicle Charger, it is necessary that the entire electrical system shares a common ground (also referred to as the common earth or common negative). A common ground connection means that the negative of all batteries and electrical components must be shared.
Note in the BCDC wiring diagram below that all component negative connections are to the same point - indicated by the ground connection icon. Depending on the vehicle, this can either be the chassis/body ground or the vehicle battery negative (some modern vehicles with “Smart Alternators” monitor the current to and from the vehicle battery, meaning that a ground connection cannot be connected to the vehicle battery negative directly).

Installation with an Anderson connector
Another common installation is to have the BCDC In-Vehicle Charger charging a battery system that can be disconnected from the vehicle – for example, using an Anderson connector. This battery system may be as simple as a self-contained power box with some charging sockets or it can be the battery system in a removable canopy, camper trailer, or caravan.
When installing the BCDC, it is important to ensure the charger is mounted as close as possible to the battery being charged. For this reason, the BCDC is often mounted directly to the self-contained box, or will need to be mounted in the canopy, camper trailer, or caravan when used to charge a battery in any of these locations.
When using an Anderson connector to connect the vehicle input to the BCDC charger, the wiring diagram below displays the changes required so that all components in the system still share a common ground.
What size fuse for a BCDC Classic25 (BCDC1225D)?
The REDARC 40A Fuse Kit is perfect for the BCDC1225D, BCDCN1225 and BCDC1220.
Do you need a solar regulator with a BCDC?
REDARC BCDC*D chargers feature an inbuilt MPPT solar regulator and incorporate Green Power Priority™.